Posts

Showing posts from February, 2012

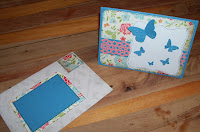
20 Minute card and envelope (Part 2)

Image
One thing that I have always struggled with is envelopes.   Not actually making them but giving ones that you have made only to have them torn when opened or just thrown away. So not to waste too much money on the product to produce an envelope I went to a couple of local wallpaper places and got free their old samples and one off rolls of wall paper.  Fantastic to use for envelopes and also for the kids to use for crafts and great for school projects.   Here is this evening offerings for a 20 minute card with upcycled envelope.   All products are 'Stampin up'  with the exception of the envelope base which is good old wallpaper.

Mini treat holders

Image
Just a little side tracked from what I was planning to do this evening but I could not resist using the designer paper from SU that arrived yesterday.  So anyway,  I am making some mini gift holders for the boys to take with them on their next sleep over: One is to hold a small thank you note from each of the boys, and the other is a paper basket for some chocolates. As mentioned the paper is from the SU summer mini catalogue. 

20 minute card and envelope

Image
Our friends have had new addition to their family - yes, a little girl.  This is a card and envelope set to welcome her to our world.      The boys are very excited to meet her finally.    I used Stampin up(SU) punches (love them), thickers, SU cardstock and a ' fabscraps ' patterned paper. The card and envelope took around 20 minutes. 

An evening of crafting - life is good

Image
I am going to spend the evening scrap booking while Gregor entertains the boys.  I have several projects underway.   - A journal arrived this week from our Cycle journal challenge  (We have only three months of our cycle journals to go)  exciting stuff, can't wait to see mine.   -  I have a week to do in my project life album - Some more detailing to do on my scrap journal - A welcome to the world card for good friends who has a new addition to their family I will post some of the results from this evening. TC is going to keep a very sleepy eye over this evening craft session.

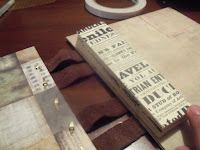
The boys homework - Quick handmade journals (30 minutes)

Image
The twins has received their first homework assignments for the year and it is to write a book about themselves.  So they asked if I could made the actual book and they would complete all the pages.  So here they are.  Again just the standard format with 10 pages in each.     Tira asked if I could make a box for the book (therefore Arahi wanted one too) I used left over card stock of random colours.  The books are approx 5x7. The boys will embellish and completed the texts over the next week before the assignment is due back at school. 

Quick cards

Image
Made some cards on Sunday morning waiting for the boys to rise for breakfast. All products from Stampin up.

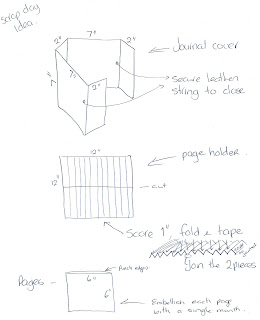
The best Scrap Journal - In the beginning....

Image
Sat down last night and started, here is stage one. Remembering that this could, of course, all change as I move forwarded.      So I made the front and back covers from recycled cardboard from work, 2 pieces for each cover just to make them a little stronger.  Covered each piece individually and them stuck them together.  Used a folded spine for the page holder.   I joined the covers with leather strips and brads. I used 2 inch squares placed on cardstock for the front.  Hand doodled stitches on each piece.  Have not thought of a journal title yet.    The next phase is to decided on the internal pages.  Currently I have just place scrap pieces to hopefully inspire me.  I will sleep on it. 

The start of something new - the best scrap journal ever.

Image
For some time now I had envisaged that I would clear out my pile of scrap paper that I have saved up over the years in the hope that it would come in handy for cards etc.  Well,  this has not come about as yet so instead I am going to make a Journal (possibly journals) using only the scraps that I have.  I will not purchase anything new.  The journal,  hopefully will be a fusion of paper and fabric.  I would like to think that rather than being perfect,  it would be something that someone would look twice at, take in the detail and before opening, pause to  imagine what wonders could be inside.  That's my hope so here goes  - Watch this space -    Today's lunch, and I am not good at sharing food, so everyone else is having sandwiches.   (courtesy of Stephen, he did drop off two, so I will share the second) 

Tag Journal instructions

Image
I have had a couple of people ask for the instructions for the Tag Journal.  I will endeavour to provide them as soon as I can.  (Anyone here is Palmy just drop me a line or give me a buzz and we could get together) Unfortunately it was a project that I thought of the night before our scrap date and only made a couple of very basic notes as you can see. And the journal grew from there.     One question that I have been asked is how I secured the pages.  Hopefully the above photos help but basically I score a 12 x 6 piece of paper  every inch, folded and secure one side.  This gave me the spine on which I attached each envelope page.  Here is a very quick example.   I hope this provides you with a little more insight to help you get started.   cheers J

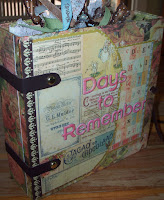
Tag journal - Days to remember

Image
Scrap day at Michelles.   Unfortunately Sarah was a little under the weather and could not join us today but still another great day.  Michelle and I chatted and solved all the issues in the world, while the rest of New Zealand was celebrating Waitangi day .  Besides adding a couple of pages to my project Life album I made the following tag journal.  I made the cover from recycled card, covered with prima paper.  The envelope pages are from SU cardstock and the tags from Prima and Kaiser papers.         There are 12 envelope pages in the journal.  I used a couple of leather strips on the cover and a leather string is used to secure the journal.         Each tag has ribbon to stop the tag from moving too far in to the envelope page.   There is a page for each month of the year and in each month I have place several tags with a memorable moment or event.   Hope you like it.